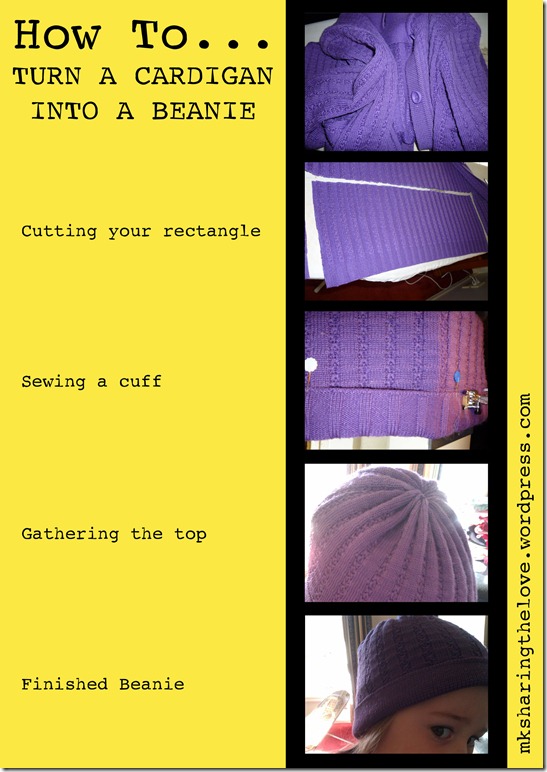
A few months ago Ashleigh at Make It – Love It posted a refashion of old jumpers into Beanies for her baby (see here). I loved the idea and her cute little embellishments so I stored the idea away until we reached colder weather.
I was quite excited to discover that our little town has an Opportunity Shop. On one of my outings I decided to check it out. Oh the bargains I found. Two cardigans and an ergonomic chair for the grand sum of $16.
I had a few spare minutes recently and decided to have a play with one of the cardigans. I created a beanie for Eve, but let me assure you, it wasn’t without it’s errors.
It wasn’t as simple as I first thought. Or maybe I didn’t think and rushed a little too much? Either way the below is a summary of my results after my initial errors.
Ashleigh’s pattern was for her baby and I knew that it wouldn’t work for children/adults because of the shape of our heads. I adjusted the pattern and had a bit of a play. Other than putting a cuff on the beanie I left out the embellishing until next time when the pattern was right.
I ended up making two beanies, one working and in use, the second needing more alteration and love.
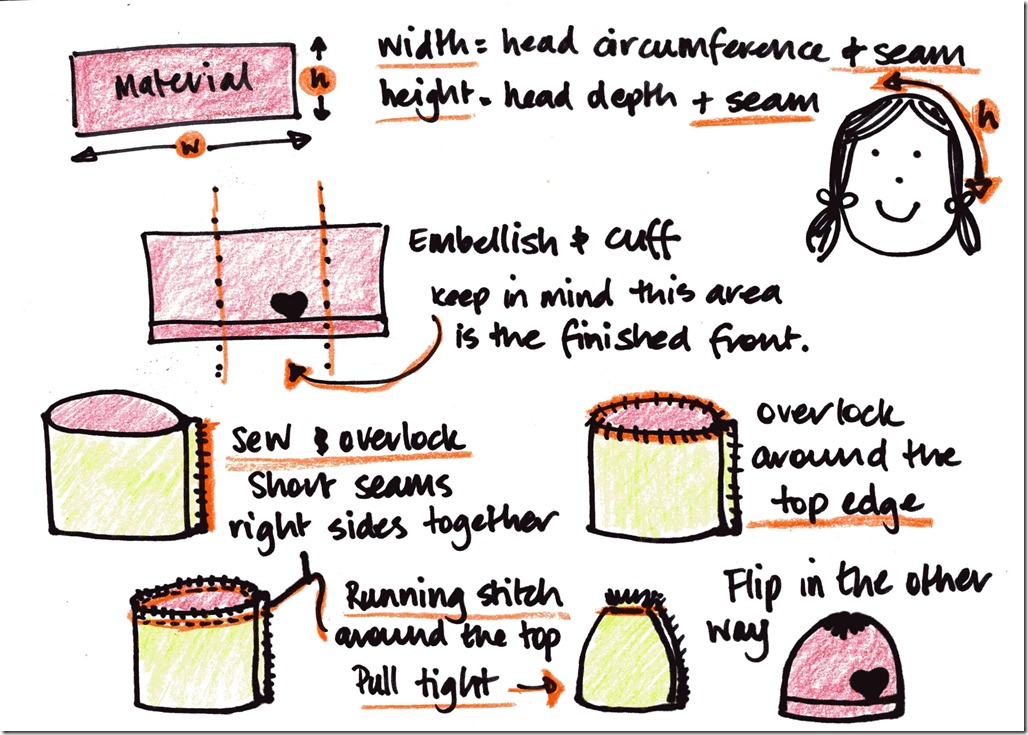
Here’s what has worked for me so far (see below for a simple diagram to go with the instructions):
- Cut a rectangle with the width of the rectangle equalling the circumference of the head you are fitting + seam allowance. And the height equalling the depth you need + seam allowance.
- Embellish and/or add cuffs to your beanie as you need. Keeping in mind that the seam sewing the two short edges of your rectangle will run up the back of the head. For my cuff, I folded up the bottom edge of the cardigan and used the hem as I really liked the stitching.
- With right sides together sew up the short edges of your beanie. Overlock if required.
- Overlock around the top (where the beanie sits in the middle of your head) of the beanie, just to stop the edge from fraying when you stitch it.
- Keeping your beanie inside out. Put a running stitch around the top of the beanie and pull tight to create a gather. Add a few more stitches across the gather to keep it tight and together.
- Flip your beanie the right way out and you are done.
Now this method still needs some work so I will let you know how I go. My little customer was very happy with her beanie and has used it a bit now it is getting cold.
I know that it seems like there is some bulk at the top but this actually works well with pony tails. When I tried to angle the fabric at the top it looked really misshapen on the head, I found the gather was more flattering.
Don’t forget to keep the rest of the cardigan, you could make gloves, mittens or leg warmers from the sleeves. Use the buttons for another project.
Any other ideas? I’d love to hear them.
Good luck.
Sharing over at The 36th Avenue:


SOOO cute! 🙂 Thanks for sharing this.
My pleasure – I’m hoping the next one is a bit more creative – but it was easy and fun.
Good idea. I’m pinning it for future reference. Thank you for sharing it.
I’m glad I could help Beth. I hope you have fun with it.
Love it! You are my learn-to-sew inspiration. First step, buy a sewing machine!
Jode, you can so sew! I can guarantee that you will find it a lot easier than what you think. Start with hand stitching – You could easily do the above with a needle and thread, it wouldn’t take long at all.